
Automatic Backups
Overview
Section titled “Overview”Regular backups are essential for keeping your server data safe. Losing your world files, configurations, or plugin data can be devastating — especially if you’ve spent weeks or months building your server. Fortunately, the Rhino Panel provides a built-in Schedules feature that allows you to automate your backups so you never have to worry about forgetting to create one manually.
This guide will walk you through the entire process of setting up automatic backups, from creating a schedule to configuring the backup task, as well as how to manage your backups using rotation and locking.
Prerequisites
Section titled “Prerequisites”Before setting up automatic backups, make sure you have the following:
- An active server on the Rhino Panel (panel.syncara.host).
- Access to the server’s management dashboard (you must be the server owner or a subuser with the Schedules permission enabled).
- At least one available backup slot on your hosting plan.
Setting Up Scheduled Backups
Section titled “Setting Up Scheduled Backups”Step 1: Navigate to the Schedules Page
Section titled “Step 1: Navigate to the Schedules Page”- Log in to the Rhino Panel at panel.syncara.host.
- Select the server you want to configure from your server list.
- In the left sidebar navigation, scroll down to the Configuration section.
- Click on the Schedules tab.
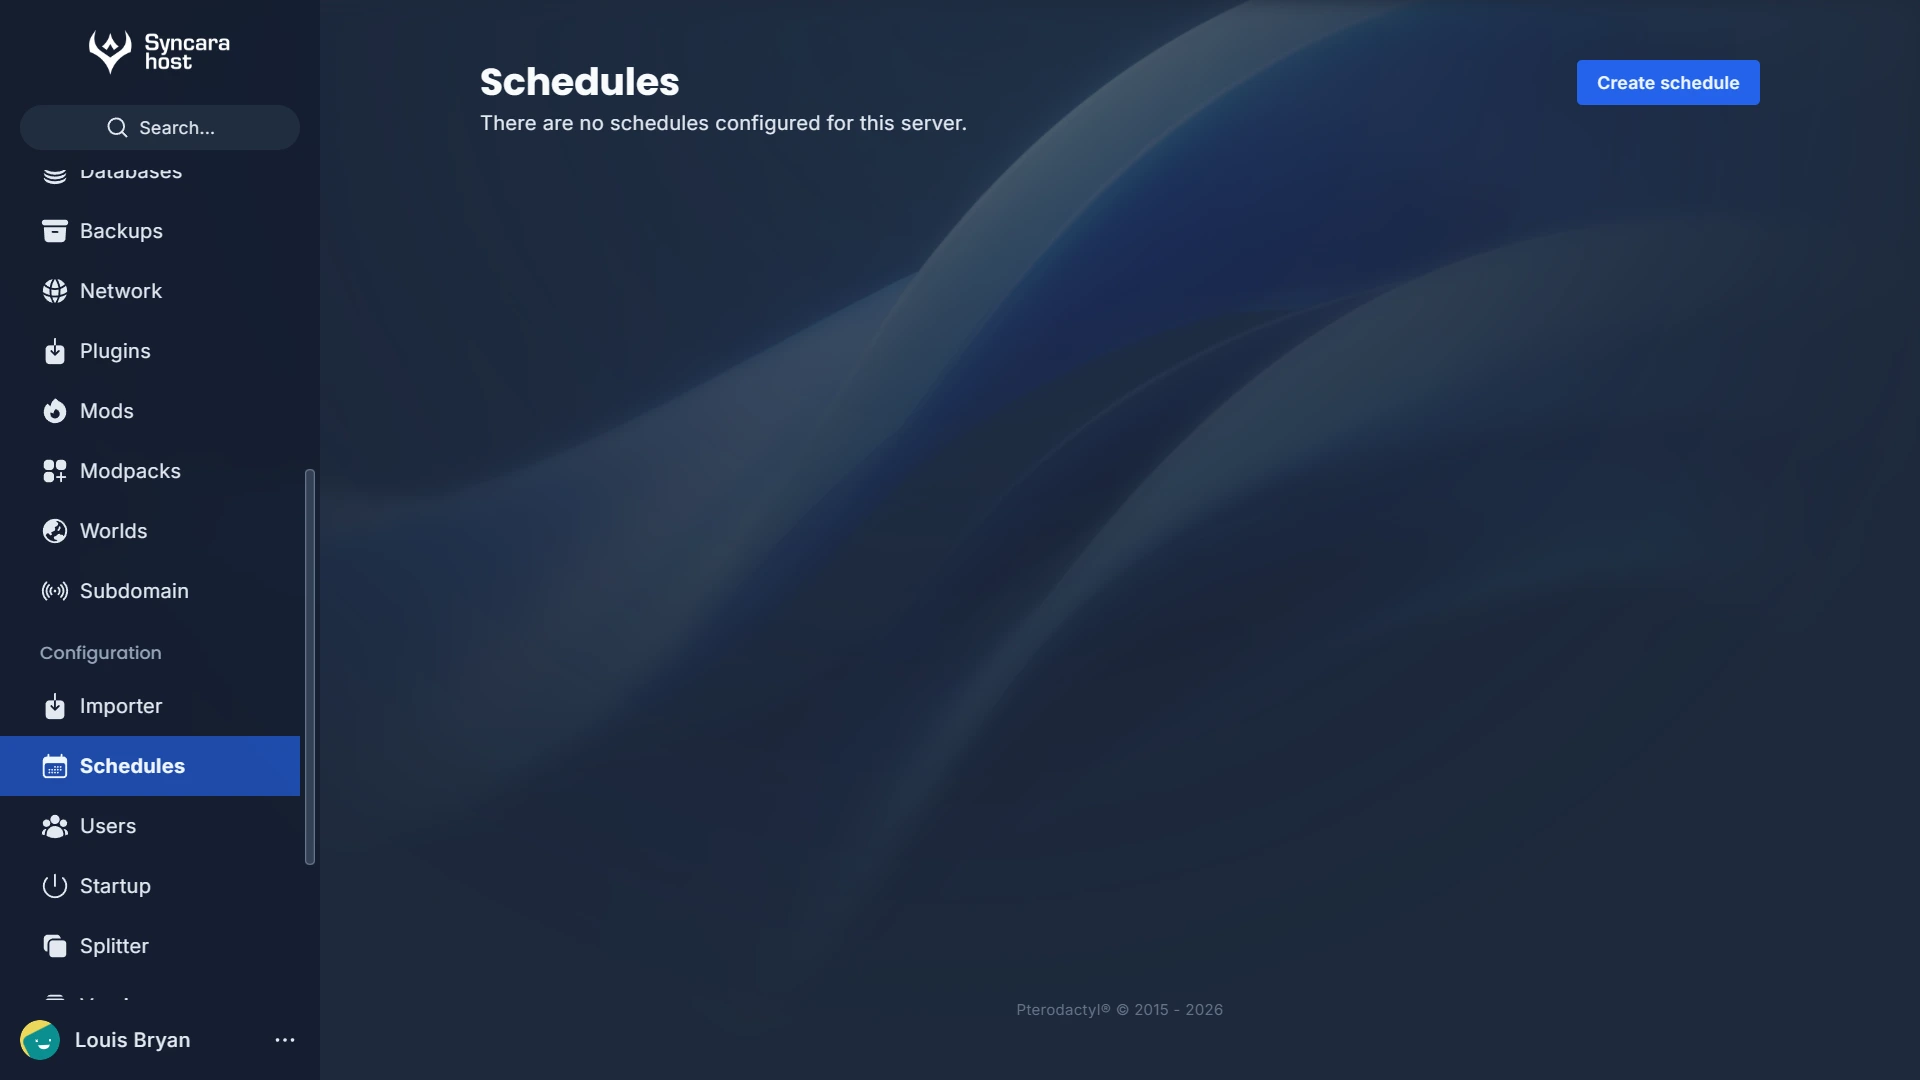
You will see the Schedules page. If this is your first time, the page will display the message “There are no schedules configured for this server.” along with a Create schedule button in the top-right corner.
Step 2: Create a New Schedule
Section titled “Step 2: Create a New Schedule”- Click the Create schedule button in the top-right corner of the Schedules page.
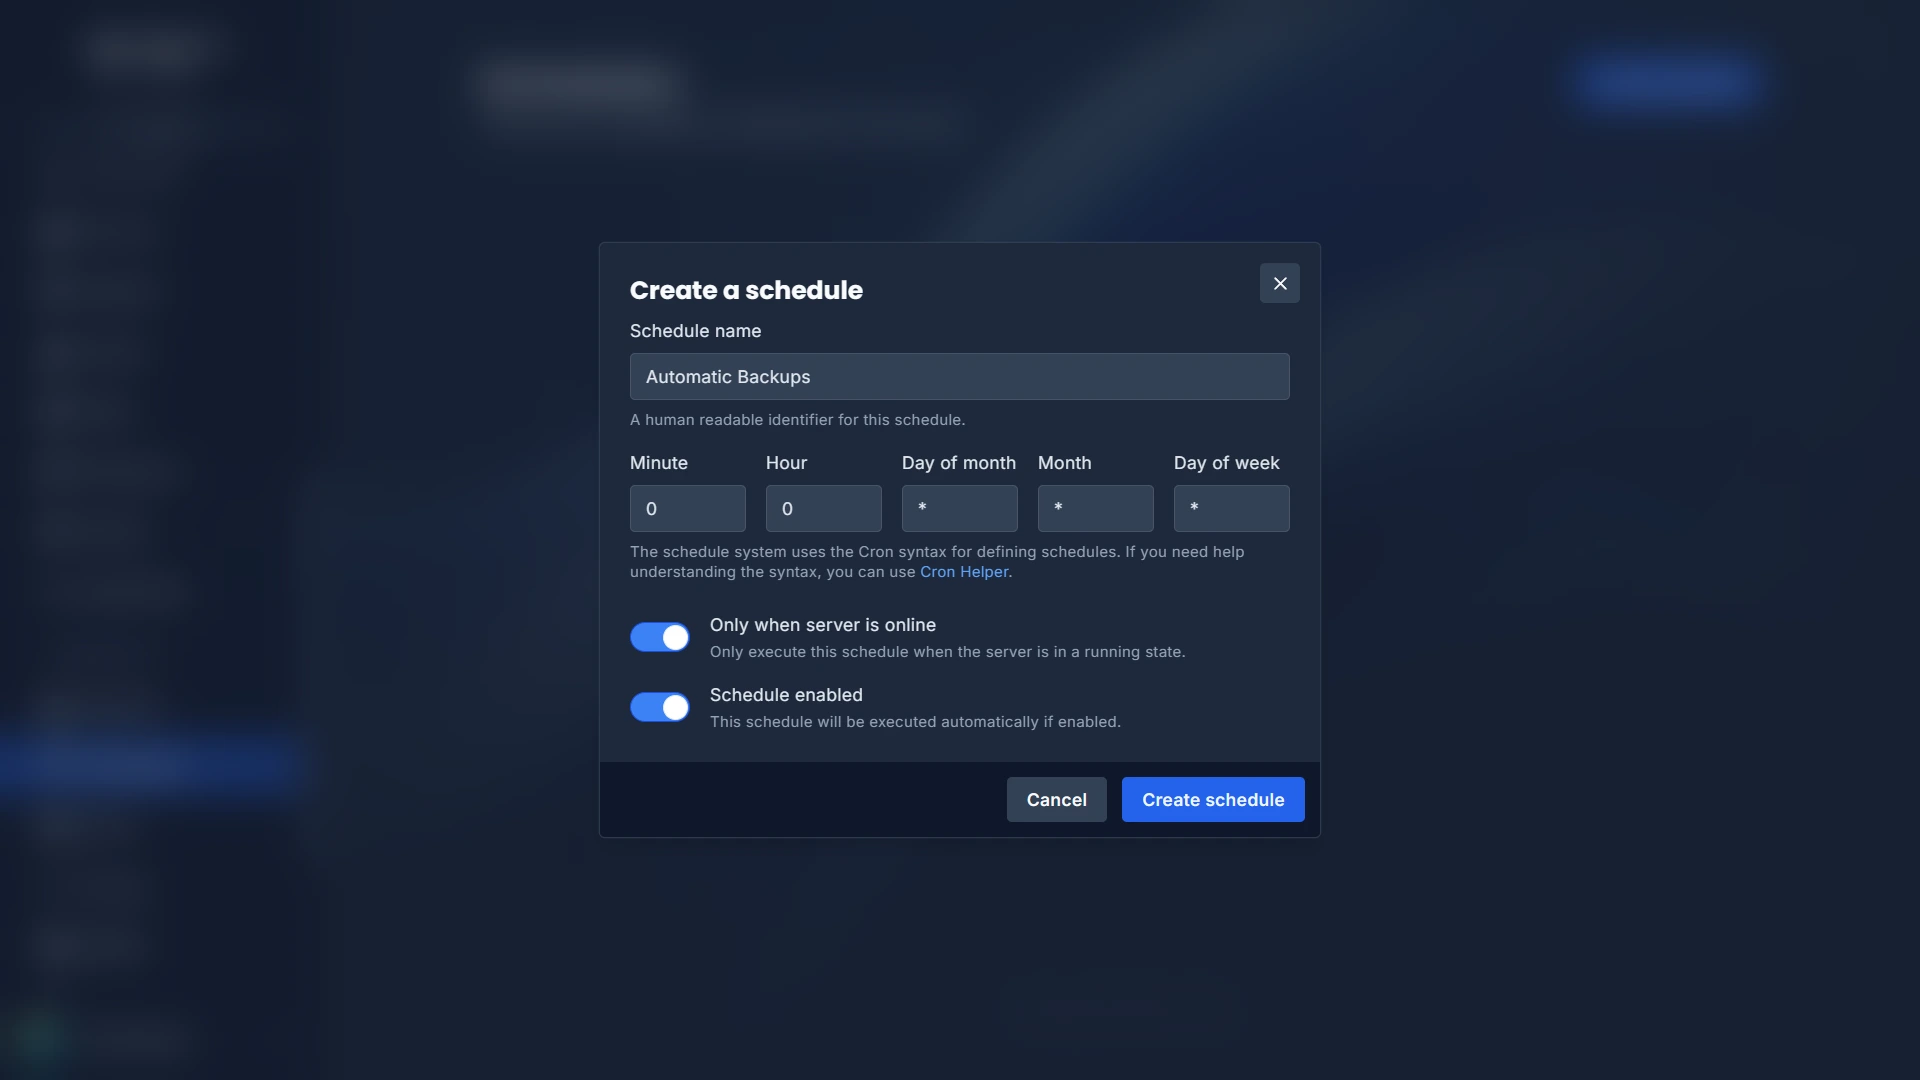
- A modal dialog titled “Create a schedule” will appear with the following fields:
| Field | Description |
|---|---|
| Schedule name | A human-readable name to identify your schedule (e.g., Automatic Backups). |
| Minute | The minute of the hour when the task runs (0–59). Use * for every minute. |
| Hour | The hour of the day when the task runs (0–23). Use * for every hour. |
| Day of month | The day of the month (1–31). Use * for every day. |
| Month | The month of the year (1–12). Use * for every month. |
| Day of week | The day of the week (0–6, where 0 = Sunday). Use * for every day. |
- Additionally, you will see two toggle options:
- Only when server is online — When enabled, the schedule will only execute when your server is in a running state. If your server is stopped or crashed at the scheduled time, the backup will be skipped. We recommend keeping this enabled so backups are only created when your server is actively running.
- Schedule enabled — This toggle controls whether the schedule is active. Keep this enabled so your schedule will be executed automatically.
Common Cron Schedule Examples
Section titled “Common Cron Schedule Examples”Here are some useful schedule configurations you can use:
| Schedule | Minute | Hour | Day of Month | Month | Day of Week | Description |
|---|---|---|---|---|---|---|
| Daily at midnight | 0 | 0 | * | * | * | Creates a backup every day at 12:00 AM |
| Daily at 3 AM | 0 | 3 | * | * | * | Creates a backup every day at 3:00 AM |
| Every 12 hours | 0 | */12 | * | * | * | Creates a backup at 12:00 AM and 12:00 PM |
| Every 6 hours | 0 | */6 | * | * | * | Creates a backup at 12 AM, 6 AM, 12 PM, and 6 PM |
| Weekly (Sunday midnight) | 0 | 0 | * | * | 0 | Creates a backup every Sunday at midnight |
- Once you’ve configured all the fields, click the Create schedule button at the bottom of the modal to save your schedule.
Step 3: Add a Backup Task to the Schedule
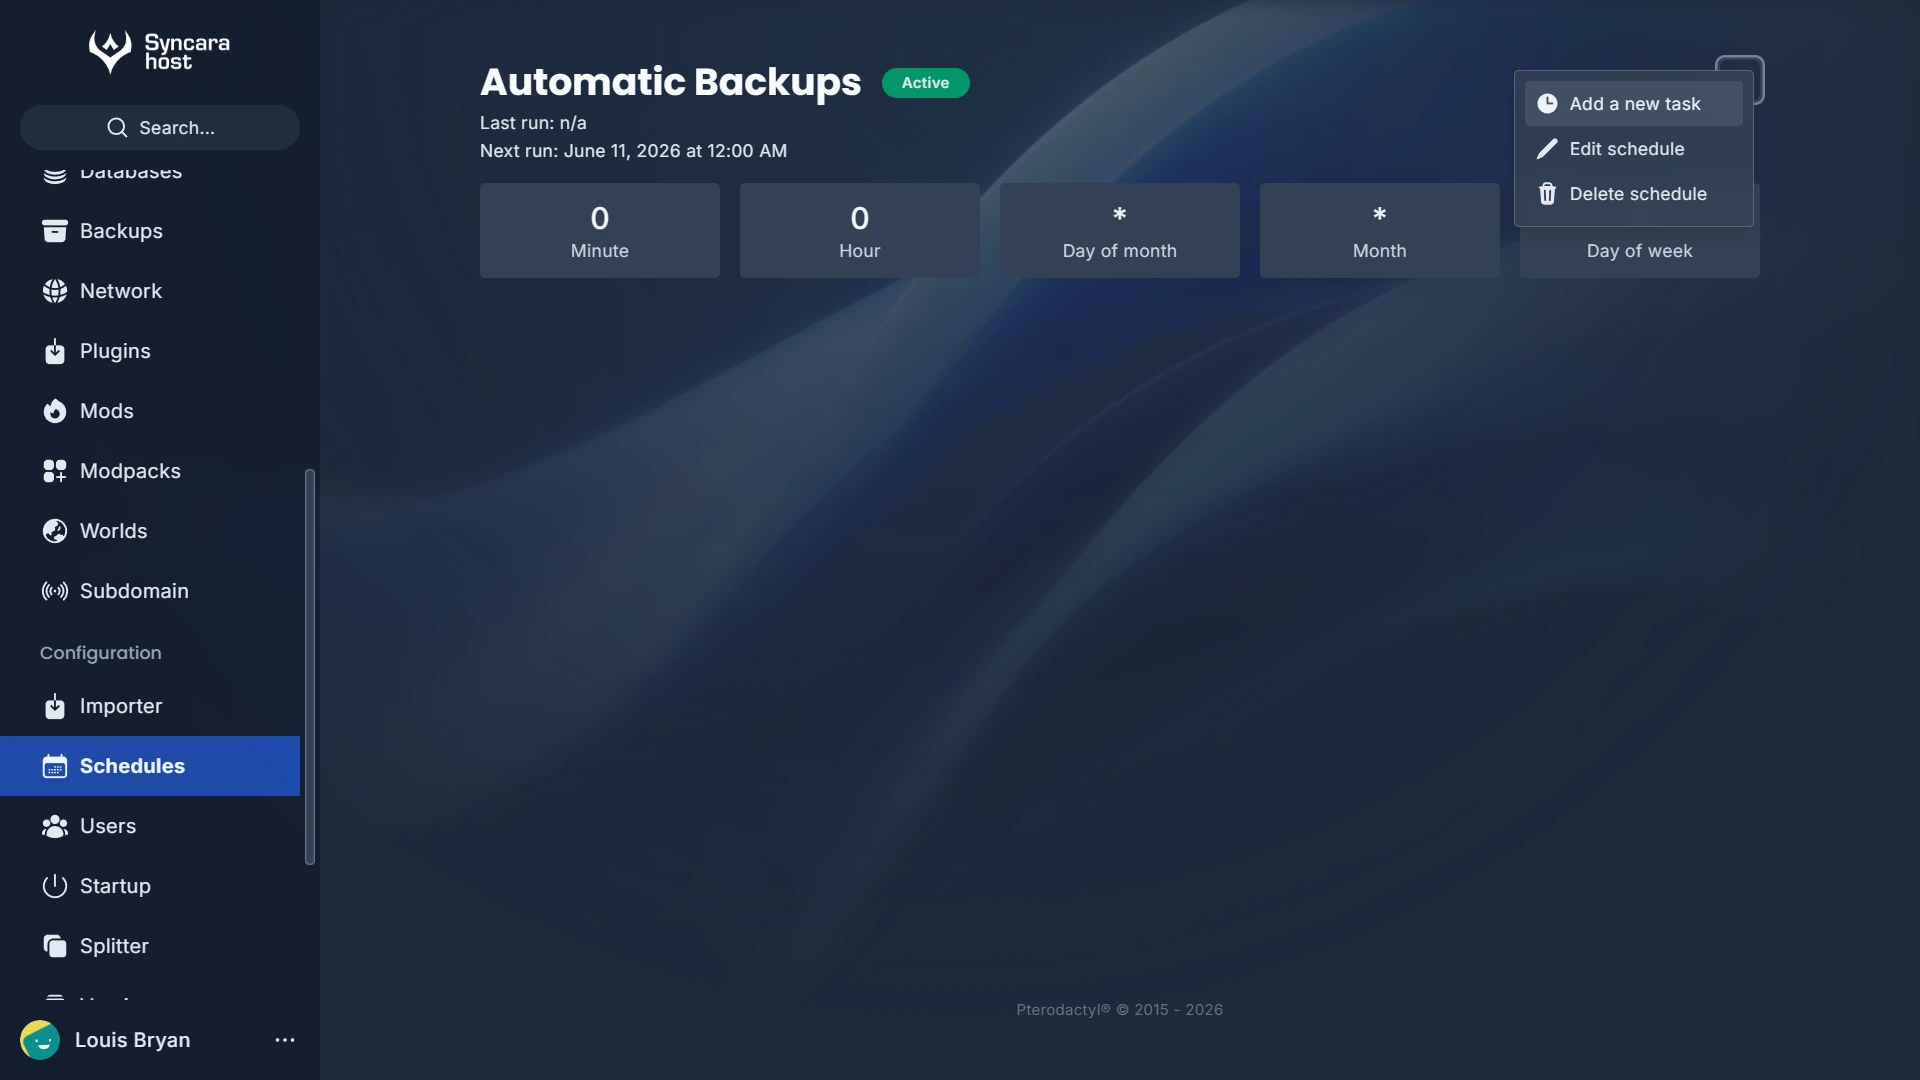
Section titled “Step 3: Add a Backup Task to the Schedule”After creating the schedule, you will be redirected to the schedule’s detail page. Here you can see the schedule name, its status (Active/Inactive), the last and next run times, and the cron values you configured.
Now you need to add a task to tell the schedule what action to perform. A schedule by itself doesn’t do anything — it needs at least one task.
- Click the three dots (⋮) menu in the top-right corner of the schedule detail page.
- From the dropdown menu, select Add a new task.
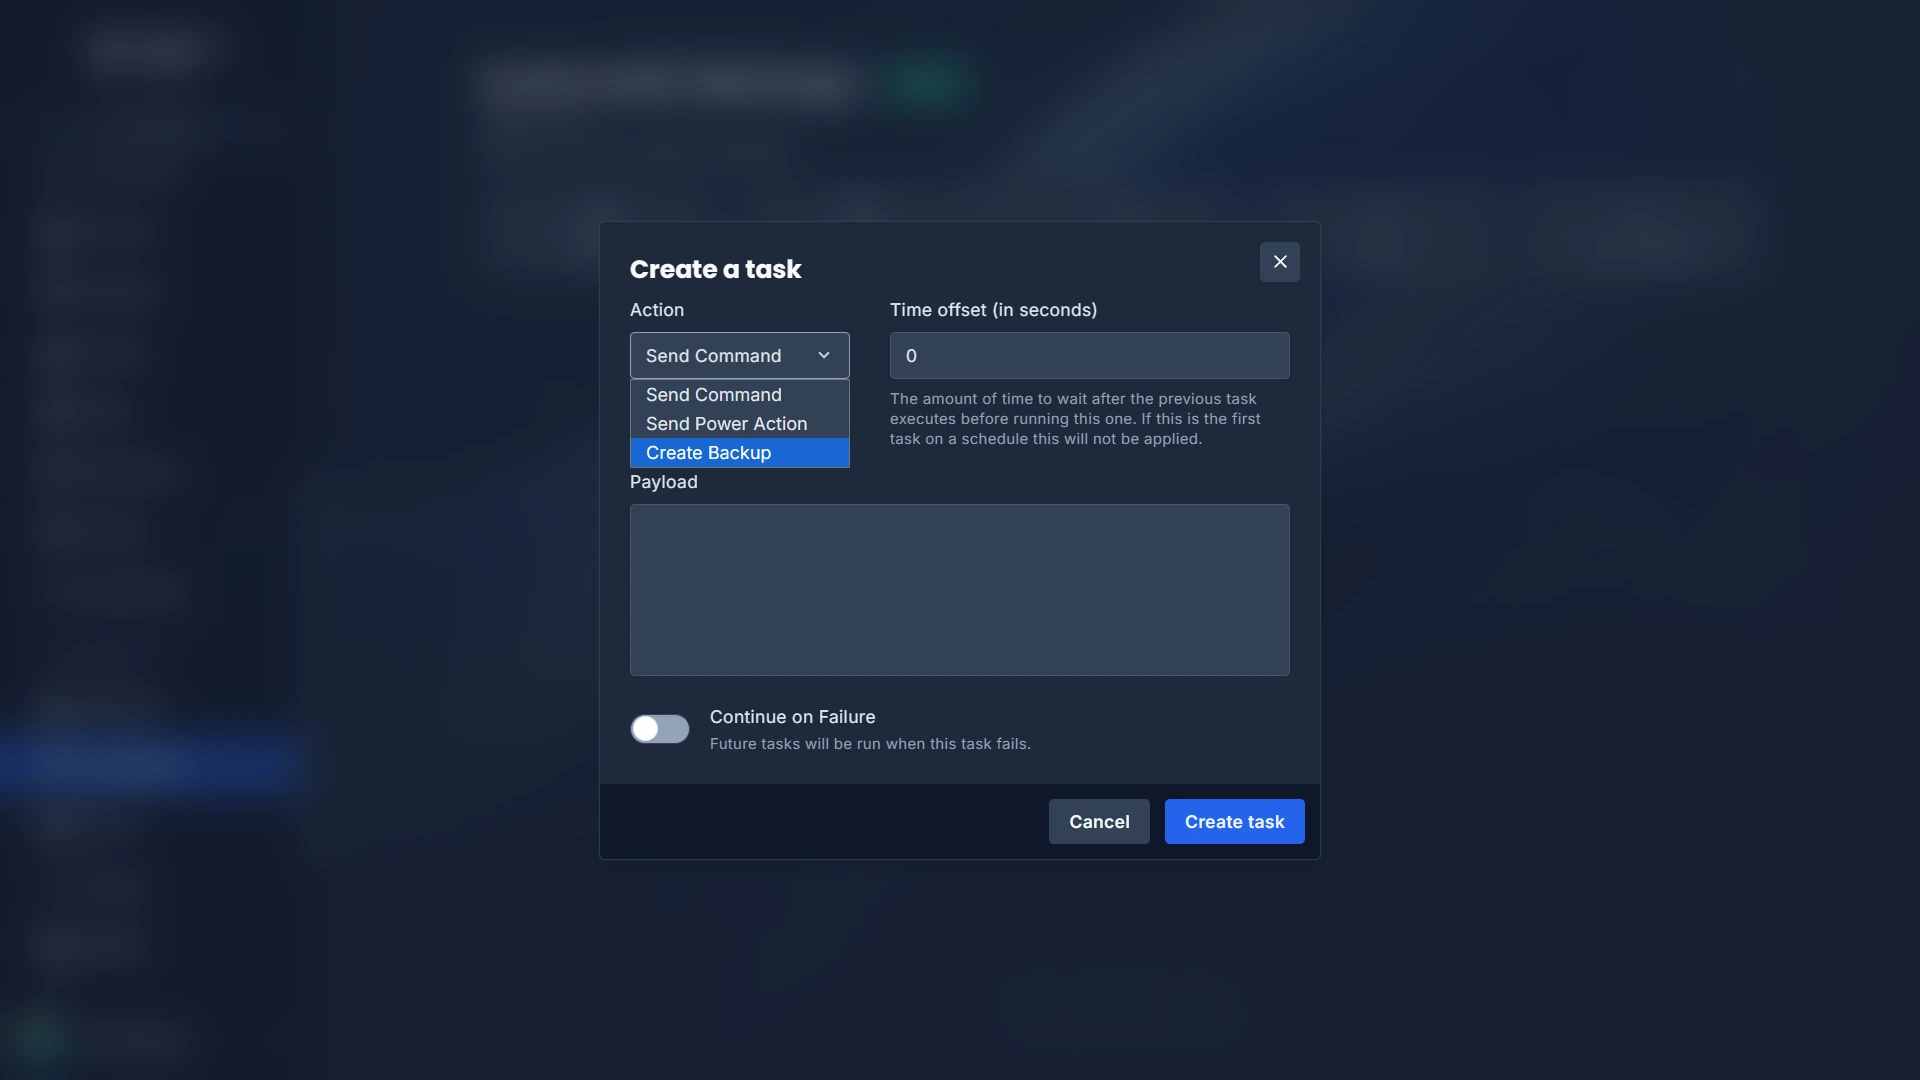
- A modal dialog titled “Create a task” will appear with the following fields:
| Field | Description |
|---|---|
| Action | The type of task to perform. Select Create Backup from the dropdown menu. The other available options are Send Command (sends a console command to your server) and Send Power Action (starts, stops, or restarts your server). |
| Time offset (in seconds) | The amount of time to wait (in seconds) after the previous task finishes before running this one. If this is the first (or only) task on the schedule, this value is not applied. You can leave this at 0. |
| Payload | For the Create Backup action, this field allows you to specify files or directories to exclude from the backup. Enter one path per line. For example, entering plugins/dynmap/ would skip the Dynmap data folder. Leave this empty to include all files in the backup. |
| Continue on Failure | When enabled, subsequent tasks in the schedule will still run even if this task fails. If you only have one task (the backup), this setting doesn’t matter. |
- Click the Create task button to finalize the setup.
Step 4: Verify Your Setup
Section titled “Step 4: Verify Your Setup”After creating the task, you will be taken back to the schedule detail page. You should now see the Create Backup task listed below the cron timing boxes.
- The schedule status should show Active (indicated by a green badge).
- The Next run field should display the date and time of the next scheduled backup.
- The Create Backup task should be visible in the task list with edit (pencil icon) and delete (trash icon) buttons.
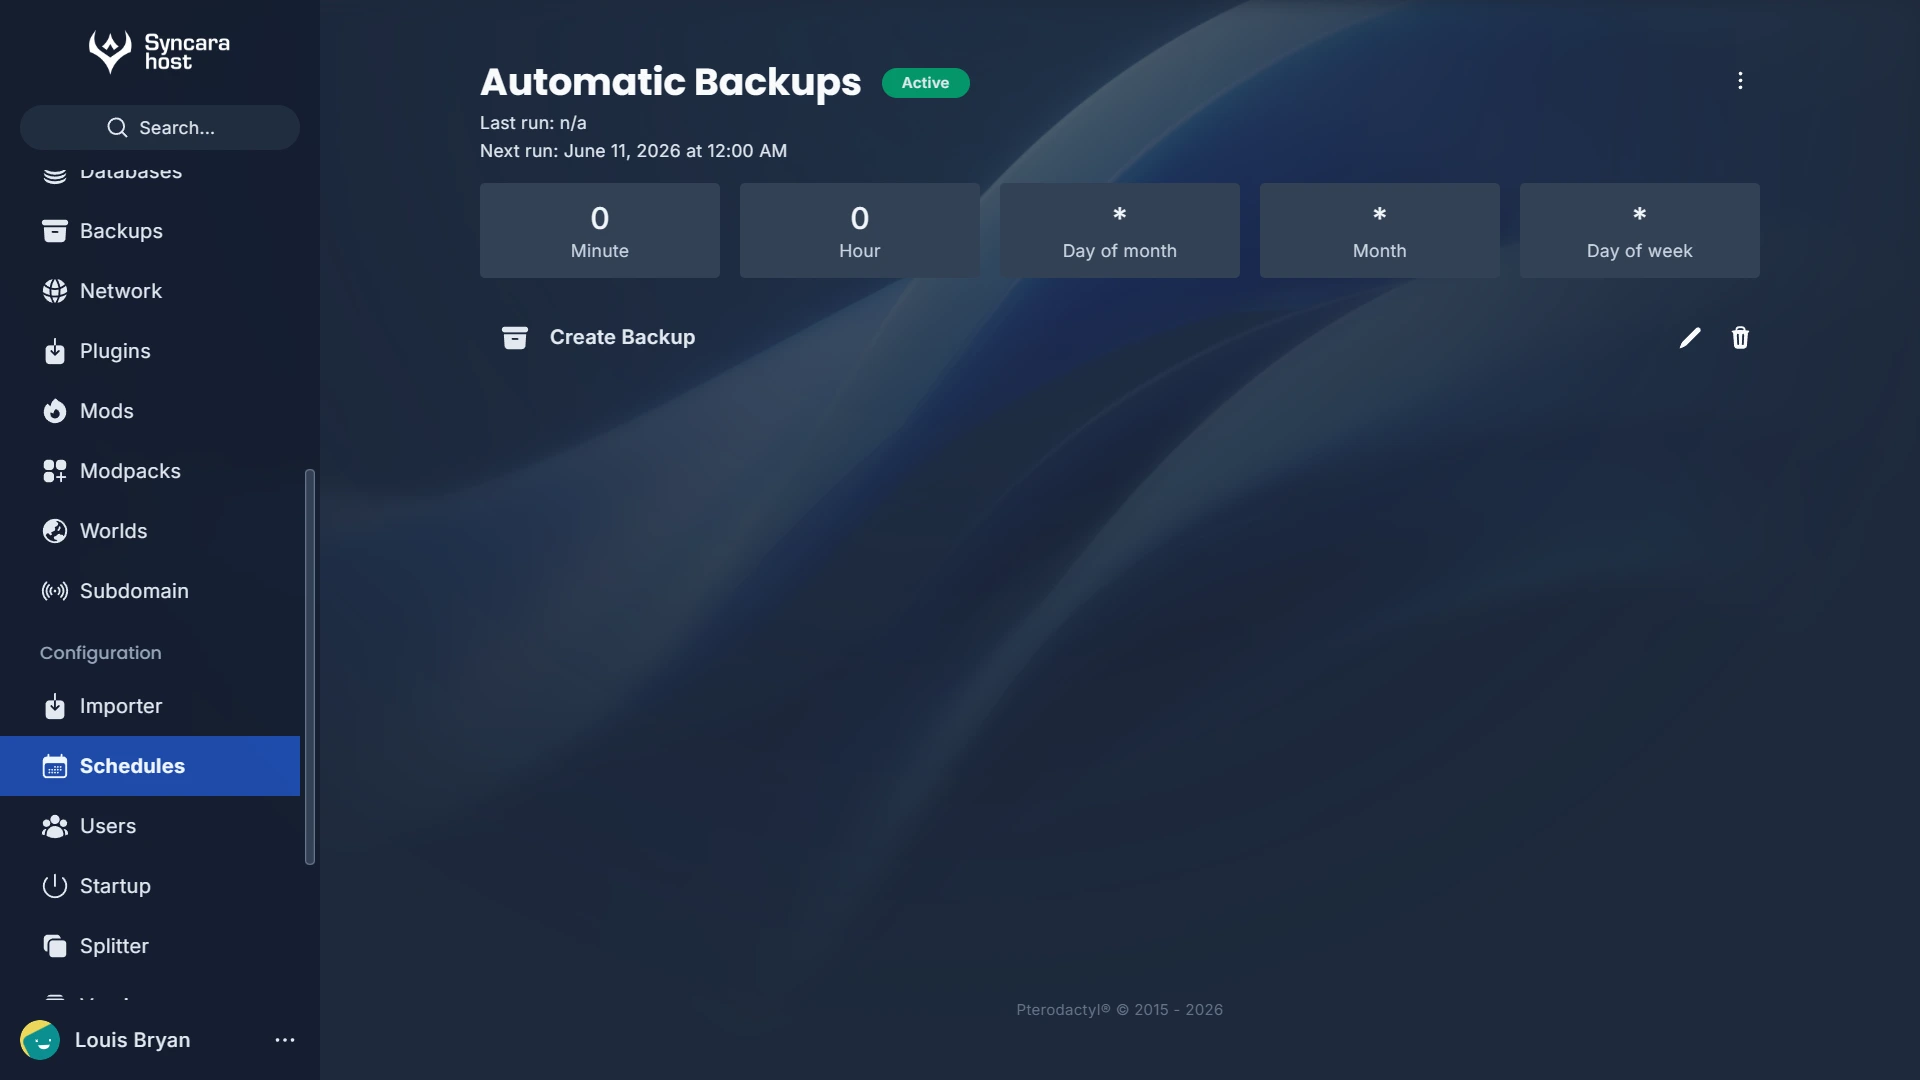
Your automatic backup is now fully configured! The panel will automatically create a backup at every scheduled interval without any manual intervention.
Backup Rotation
Section titled “Backup Rotation”Our system uses backup rotation to ensure your automatic backups always run successfully. Here’s how it works:
- Every hosting plan has a maximum number of backups that can be stored at the same time (this limit depends on your plan).
- When a new backup is created and your server has already reached its backup limit, the system will automatically delete the oldest unlocked backup to make room for the new one.
- This process repeats every time a new backup is created, ensuring you always have the most recent backups available.
How Rotation Works in Practice
Section titled “How Rotation Works in Practice”Let’s say your hosting plan allows a maximum of 3 backups. Here’s what happens over time:
| Action | Backup Slot 1 | Backup Slot 2 | Backup Slot 3 | What Happened |
|---|---|---|---|---|
| Day 1 backup | Backup A | — | — | First backup created |
| Day 2 backup | Backup A | Backup B | — | Second backup created |
| Day 3 backup | Backup A | Backup B | Backup C | All slots full |
| Day 4 backup | Backup B | Backup C → Backup D | Oldest (A) deleted, new (D) created |
Locking a Backup
Section titled “Locking a Backup”If there is a specific backup you want to protect from automatic rotation and keep permanently, you can lock it. A locked backup will never be automatically deleted by the rotation system.
How to Lock a Backup
Section titled “How to Lock a Backup”- In the Rhino Panel, navigate to the Backups tab on your server’s page (this is in the left sidebar, under the server management section).
- You will see a list of all your existing backups with their names, sizes, and creation dates.
- Find the backup you want to protect.
- Click the three dots (⋮) menu on the right side of that backup entry.
- Select the Lock option from the dropdown menu.
The backup will now be marked as locked and will be protected from automatic deletion.
How to Unlock a Backup
Section titled “How to Unlock a Backup”If you no longer need to keep a specific backup protected, you can unlock it at any time:
- Go to the Backups tab.
- Find the locked backup.
- Click the three dots (⋮) menu.
- Select the Unlock option.
The backup will become eligible for rotation again, meaning it may be automatically deleted if it becomes the oldest backup and the limit is reached.
Managing Your Schedules
Section titled “Managing Your Schedules”Editing a Schedule
Section titled “Editing a Schedule”If you need to change the timing or other settings of an existing schedule:
- Go to the Schedules page.
- Click on the name of the schedule you want to edit.
- Click the three dots (⋮) menu in the top-right corner.
- Select Edit schedule.
- Modify the fields as needed and save.
Disabling a Schedule
Section titled “Disabling a Schedule”If you want to temporarily stop a schedule without deleting it:
- Edit the schedule (see above).
- Toggle off the Schedule enabled option.
- Save the changes.
The schedule will remain in your list but will not execute until you re-enable it.
Deleting a Schedule
Section titled “Deleting a Schedule”To permanently remove a schedule:
- Go to the schedule’s detail page.
- Click the three dots (⋮) menu.
- Select Delete schedule.
- Confirm the deletion.
Best Practices
Section titled “Best Practices”Here are some recommendations to get the most out of your automatic backups:
- Schedule backups during low-activity hours. Running a backup while many players are online may cause brief lag spikes. Midnight or early morning hours are typically best.
- Don’t over-lock your backups. Keep at least 1–2 backup slots free so rotation can work properly. Only lock backups that represent major milestones (e.g., before a big update or world reset).
- Download important backups locally. For critical backups, don’t rely solely on the panel — download them to your own computer or cloud storage for extra safety.
- Test your schedule after creating it. Use the Run Now feature to trigger the schedule manually and verify that the backup is created successfully.
- Consider your server’s data size. If your server has a lot of data (e.g., large world files, many plugins), backups may take longer to complete. Make sure your backup schedule has enough time between runs.
Troubleshooting
Section titled “Troubleshooting”| Problem | Possible Cause | Solution |
|---|---|---|
| Backup task is not running | Schedule is disabled | Edit the schedule and enable the Schedule enabled toggle |
| Backup task is not running | ”Only when server is online” is enabled and the server is stopped | Start your server, or disable the “Only when server is online” option |
| Backup fails | Backup limit reached and all backups are locked | Unlock or delete an old backup to free up a slot |
| Backup fails | Insufficient disk space on the server | Remove unnecessary files or contact support to upgrade your plan |
If you continue to experience issues with your automatic backups, please don’t hesitate to contact our support team at support@syncaracloud.id.